
ОПЫТ: SOUS VIDE ПРЕЗЕНТАЦИЯ
Вспомните: Что вдохновило вас купить су настройку Vide в первую очередь? Конечно, он имеет много общего с предсказуемость и удобство-каждый мог использовать больше как на кухне, но это также о принятии ваши навыки приготовления пищи на следующий уровень. Мы все знаем, су смотри это техника любимцем лучших шеф-поваров в мире, и кто не хочет готовить больше как Грант Achatz или Томаса Келлера? И в то время как основы низкотемпературного приготовления с циркуляционным насосом довольно легко получить свою голову вокруг (предварительно шептала, положить в сумку, падение в ванну, ждать, чтобы поесть), все становится намного больше удовольствия, когда вы завоевали next- навыки уровня для создания ослепительно су смотри блюда для ваших друзей и семьи.
Потому что вот в чем дело: Научиться готовить су смотри означает освоение целый новый приготовления среды, а именно полиэтиленовый пакет на водяной бане-что может дать очень разные результаты, чем традиционные печи и кухонные плиты. Имея это в виду, мы на скорую руку этот праймер, чтобы помочь вам достичь великолепных, вкусные блюда с помощью циркуляционного насоса. Наш кухонный персонал потратил годы настройки свои методы и вопросы по устранению неполадок, от деформированных куриные грудки с скучным цвета овощей. Мы также обнаружили некоторые интересные термостаты трюки, которые сделают его более легким для вас делать такие вещи для повторного нагревания пюре и Шак устриц (или любой двустворчатого моллюска, на самом деле). Читайте на наших лучших советов для оптимизации ваших су навыки Vide, а затем получить приготовления пищи.
PSST: Любые другие су вопросы Vide вы хотели бы видеть нас решать? Пожалуйста, поделитесь ими в комментариях. Потому что то, что вы видите здесь это только начало. Скоро: су класс смотри, что будет идти путем, путь глубже в технике, готовой взять домой готовить к совсем другой уровень.
EQUIPMENT
YIELD
Sous vide dishes that taste great and look supah sexay.
Better Sous Vide Techniques
Funky-shaped chicken breasts, dull-looking vegetables, goopy egg whites—these are common issues for cooks getting started with sous vide. Hey, we've all been there. But experience has taught us that a few simple tricks can mean the difference between an awkward-looking dish and the sort of pretty plates chefs present at the best restaurants.
Here, our favorite tips for avoiding the common pitfalls that come up when you're working with a circulator.
Oil up
When cooking proteins sous vide, you always want to add oil to the bag. Adding ample oil is especially important with delicate foods or small pieces. How much is ample? Think of it this way: You can get into all sorts of trouble from a lack of liquid in the bag (much more on that below), whereas adding more than you might need has few downsides—other than waste, of course. But much better to use a little too much oil as you learn than damage lovely fresh vegetables and proteins, right? After a few trials you'll figure out exactly how much you need.
How does adding oil help you get great results?

It prevents warping.
It prevents warping.
When, for instance, a chicken breast slides to the bottom of a ziploc-style bag, it often gets pinched in the corner and takes on that shape as the collagen converts to gelatin in the cooking process. The result: a warped-looking breast with unseemly seams at the edges. Adding oil will prevent this and preserve the cut's natural shape.
Getting the air out: Ziploc-style bags
Getting the air out: Ziploc-style bags
No vacuum? Ziploc-style bags will serve you nicely when your water bath is set to temperatures at or below194 °F / 90 °C. And while they're not as tough as sous vide bags at higher temperatures, they will work in many situations, including preparing sous vide custards and pastry creams. (See thisforum thread for more details.)
Still, you've got to get the air out of those baggies before you cook. Check out our Simple Sous Vide Packaging technique to learn how we use water displacement to do just that.
It keeps edges sharp.
It keeps edges sharp.
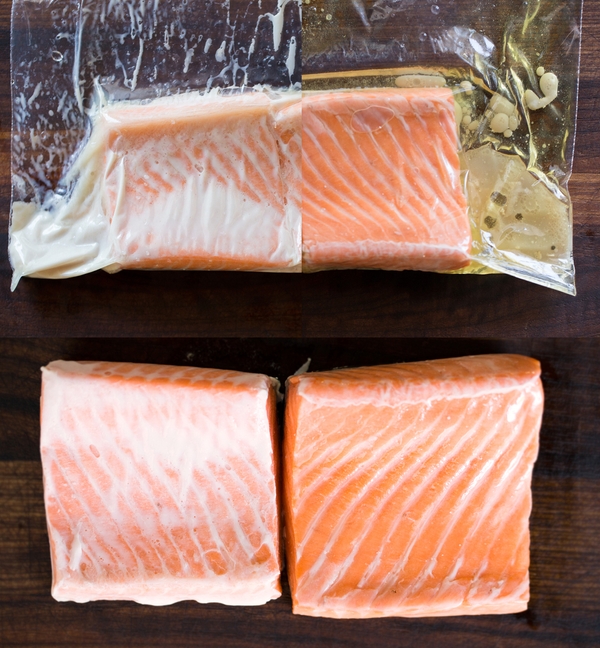
If you've cooked fish or poultry—using either traditional methods or sous vide—you've likely noticed an unattractive white ooze forming on the edges. This is albumin, a simple protein that coagulates under heat. And it has a tendency to dull the sharp, clean edges that we covet when presenting guests with a fresh piece of fish.
Adding oil to fish before you cook it sous vide will allow the albumin to run off your food and sink to the bottom of the bag, keeping those nice edges intact.
It keeps things moving.
It keeps things moving.
Seasoning is just as important with sous vide as it is with traditional methods. Adding aromatics to the bag while you cook goes a long way in creating a flavor-forward dish.
The trouble comes when you combine a delicate protein—halibut, say—with things like garlic and a sprig of rosemary. The aromatics have a tendency to squish into the fish, creating weird-looking depressions in its flesh. Adding liquid to the bag will prevent your seasonings from "stamping" your protein, sticking instead to the job they're supposed to do—add flavor.

Hold off on slicing
Everyone loves to prep in advance, and there's a temptation with sous vide cooking to portion food as early in the process as possible. Often, however, it's smart to cook first, slice later. Here's why.

It's easier to achieve neat, evenly shaped pieces.
It's easier to achieve neat, evenly shaped pieces.
Picture chopping your way through uncooked carrots—the hardness of the raw vegetables is not only murder on your knives, it also makes it difficult to get precise, evenly shaped pieces. Now, picture yourself gently slicing through supple, sous vide–cooked veg. That's better, isn't it?
Another reason to hold off: Pre-sliced pieces have a tendency to rub up against each other in the bag like teenagers at a high school dance. This often results in lumps forming on the individual slices where they joined together with other pieces; cooking vegetables whole will help you avoid this unfortunate consequence of inner-bag coupling.
It'll prevent meat from looking dry and discolored.
It'll prevent meat from looking dry and discolored.
One of the best things about preparing meat sous vide is you can cook it in advance, then reheat it just before serving. It may seem easier to portion your proteins after their spell in the water bath and before the reheating stage. We suggest, however, that you wait until just before you plate it. Meat sliced in advance has a tendency to dry out and become discolored along the sides; it has none of that lovely sheen you see on just-sliced portions. Remember when slicing any soft sort of food, you want to cut with a forward-backward motion rather than sawing through it.

Avoid overcrowding
For the best results with sous vide, always avoid cramming the bath or bags. Here's why.
How much is too much?
How much is too much?
To check if you have overcrowded your bag, lay it flat on its side atop your work surface. The contents should spread out in a single layer rather than overlapping or piling up.
It'll protect delicate foods.
It'll protect delicate foods.
Given enough space, prawns and other delicate foods cook beautifully in a sous vide bath. But cram a bunch of them in a bag at once and you'll wind up with a lot of mangled, terrible-looking crustaceans. Overcrowding also dramatically impacts the cooking time, resulting in unevenly prepared food—some pieces overcooked, some still nearly raw.
Place pieces carefully inside the bags so that they all have equal access to the warm water surrounding them.

Keep things moving
Yes, the beauty of low-temperature cooking is that you don't have to micromanage your food as it cooks. But sometimes, simply placing food in a bath and walking away is not the best way to go. Gently agitating the bag at regular intervals can speed up the cooking process and keep food from sticking together. And hey, it's still a whole lot easier than slaving over a hot stove.
It'll help you achieve clean edges.
It'll help you achieve clean edges.
Again, here, we are trying to prevent foods from having too much contact with each other as they cook. If you pre-portion salmon pieces and stick them in a bag, they will slide together and stick to one another. Try to separate them, and you'll wind up ripping the pieces and creating jagged edges. As we pointed out above, adding oil helps. So does agitating the bag lightly every 10 minutes or so to move the pieces around.


It can speed things along.
It can speed things along.
We love using sous vide to reheat purées. Reheating them on a stove top is tedious and requires close vigilance—preventing you from attending to other components of your dish. It's also hard to achieve even heating; often, the purée at the bottom, near the heat source, gets very hot and requires constant stirring to prevent scorching, while the top portion is barely warm. Meanwhile, the texture of your once-smooth purée turns chunky, and the color grows dull. You can avoid all this by portioning the purée into smaller bags, and dropping those in a sous vide bath (we generally heat them at about 140 °F / 60 °C) to warm evenly as you attend to other tasks. If you're in a hurry, or have a lot of purée to reheat, agitate the bags every couple of minutes to speed up the process.

Lower the temp.
It'll preserve color.
It'll preserve color.
When preparing green vegetables, you always want to preserve that super-vibrant color that signals their freshness and palatability. The higher the temperature at which you cook these plants, the more rapidly you'll denature the chlorophyll, thus dulling their color.
In the image below, you see asparagus cooked at two temperatures: 95 °C (left) and 85 °C (right). After 20 minutes in the bath, the stalks cooked at 95 °C were dull and brownish, while the ones cooked to a lower temperature maintained their bright green hue. The takeaway: turn the temperature down for better-looking veg.

Press as you chill
Here's how to press meat as it chills.
Here's how to press meat as it chills.

Fill a pan or high-sided tray—we use hotel pans—with ice. On top of that, add another of equal size. Place meat inside and surround with ice. Top that with another pan or tray full of, you guessed it, ice. Place the whole thing in the fridge if desired, then get ready for some nice-looking meat.
It'll help you create perfect portions.
It'll help you create perfect portions.
Pressing the meat as you chill it is a cool technique that yields a flat, even surface with a clean, appetizing look. The flat surface will also help you get a nice even sear.
This technique works great with steak but we especially love to press pork belly since the belly has a tendency to firm up and become uneven as it chills.

Clean up that egg
It'll keep the goopy bits off your plates.
It'll keep the goopy bits off your plates.
There are actually two parts to an egg white, and often the outer white—the section outside the egg-white membrane—won't fully coagulate during cooking. Most of us like our eggs free of watery, goopy bits, which a slotted spoon drains out handily. Simply lift your slow-cooked egg with the spoon, agitate gently to loosen the unwanted bits, and serve.
Chef's tip: Eggs sometimes crack in the bath. Avoid this by clipping the bag you are cooking them in against one side.


Find your perfect sous vide egg.
Find your perfect sous vide egg.
The first predictive tool from ChefSteps, our Egg Calculator gives you all the information you need to create the slow-cooked egg of your dreams. So, what's your perfect egg?

Firm oysters

It'll make shucking way easier.
It'll make shucking way easier.
Blanching oysters (or other bivalves) in a water bath at 140 °F / 60 °C for just a few minutes makes them easy to open. If you time it right, the oyster doesn't cook, but it does end up with a gorgeous plump appearance and an appealing firm texture that heightens its freshness. And because this technique makes it easy to pop the oyster open, you're less likely to end up with shell debris floating in the salty brine surrounding the oyster.
Get Inspired: Try These Sous Vide Recipes
Ready to impress some guests with your new pro-level sous vide skills? Get going with these highly relevant recipes.
Левый блок
Lorem ipsum dolor sit amet, consectetuer adipiscing elit, sed diam nonummy nibh euismod tincidunt ut laoreet dolore magna aliquam erat volutpat.
Правый блок
Lorem ipsum dolor sit amet, consectetuer adipiscing elit, sed diam nonummy nibh euismod tincidunt ut laoreet dolore magna aliquam erat volutpat.